TOWER OF FROZEN SHADOW
| Location: | Large evil tower jutting up from one of the Icy Fingers |
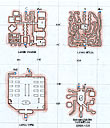
Tower of Frozen Shadow click to view expanded map and printable info... |
|---|---|---|
| Adjacent Zones: | Iceclad Ocean | |
| Level of Monsters: | 28-56 | |
| Types of Monsters: | 1st: Shadow Beast, Lesser Ice Shade, Shadowbone, 2nd: Ghostly Student, Ghostly Scholar, Ghostly Teacher, Librarian, Librarians Assistant, 3rd: Armored Shadow, Zombie Butler, Zombie Maid, Shadow Beast Servant, Shadow Beast Cook, Skeleton Sleeper, 4th: Maggot Infested Flesh, Ancient Mummy, Oozing Flesh, Shadow, Armored Shadow, 5th: Golem Usher, Undead Bridesmaid, Undead Priest, Undead Dancer, Undead Musician 6th: Shadow Beast Guard, Ice Shade, Icy Shade, Incoherent Spirit, 7th: Shrouded Bat, Enraged Vampire ?th: Shaded Torch, Crystallized Shadow Guard, Fading Shadow Guard, Frost Familiar, Shadow Familiar, Blood Familiar, Emerald Familiar | |
| Notable NPC's: | 1st: Large Undead Gnoll (Crystal Key), Xalgoti, 2nd: Librarian, Assistant Librarian, Angry Librarian (Three Toothed Key), Zorglim the Dead, 3rd: Angry Chef, Enraged Gnoll Cook, Enraged Shadowbeast (Frosty Key), 4th: Cara Omica (Small Rusty Key), Amonpheta, Narmak Berreka, 5th: Daman, Eugie, Isopca, Lerty, Nosja, Otdd, Pelpa, Priest Majes Madory, The Head Usher, Tihgren, Vargie, Uenlarc, Vyakna, enraged relative (Bone Finger Key), 6th: Incoherent Spirit, lucid spirit of Abrahms, Vhal'Sera, 7th: Tserrina Syl'Tor | |
| Unique Items: | Abram's Maul of the Stoic, Beer Stained Coldain Tunic, Ceremonial Wedding Sword, Chilled Scythe, Crystallized Shadow Armor, Crystallized Shadow Weapons, Diamond Wedding Band, Embalmers Skinning Knife, Fading Shadow Weapons, Frost Covered Tome, Gnome Skin Armor, Harnessed Soul Gem, Laced Veil, Maggot Ridden Flesh, Magnetic Dirk of Distraction, Prophecy Scroll, Robe of Tserrina, Runed Etched Wedding Band, Shaded Torch, Shadowbone Staff, Shadowbone Bracers, Shadowbone Earring, Shadow Velium Weapons, Shield of Shadows, Signet Ring, Sorcerous Bowl, Sparkling Soul Necklace, Splinter of Frozen Shadow, Students Homework, Teachers Syllabus, Tserrina's Robe, Tserrina's Robe, Velium Spiked Skull Helm, Vhal'Sera Skull Earring | |
| Indoor/Outdoor: | Indoor |
Allakhazam Links: Bestiary
|| Equipment
|| Quests
|| Strategy
Text last updated: 12/22/02
Map last updated: 02/22/02
Description
The tower appears to be something of a school for the undead. There are at least seven levels, all of which require a key to move higher, that have undead on every floor. The tower's history is shrouded in mystery, but it appears that the once-living members of the tower were brought here to remain safe during the Erudite/Heretic war, but something unknown came to pass and left them cursed to remain here forever.
Info by Level
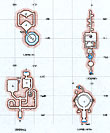
The keys are needed to go between every level as you move higher and higher into the tower. None of the keys are soulbound, so be prepared with an evac in case you lose your keyholder. The keys are used by using the key on a mirror, which will teleport your group to the next level. There are also exit mirrors located on every floor that will teleport you to a place outside the tower if you need to leave. All the keys are no drop. There is no key needed to get from level 6A to 6B (which is why they're both called level 6). The mirrors do not count as zone lines, which means that when you pass through them, you retain the aggro of creatures you left behind. They will eventually find a way to reach you, and usually with a rather large group of friends to help them out. Do not flee by using the mirrors (unless you go outside).
The first level consists of a lot of shadowbone skeletons as well as the other undead listed. The Large Undead Gnoll who drops the key to the next level spawns after killing any of the shadowbones or undead gnolls anywhere on the level, although is far more common off of shadowbones. Occasionally killing the Large Undead Gnoll will cause three shadowbones or shadow beasts to spawn. There is also a portal to the 7th level, but that requires the highest level key to enter. Monsters here are 28th-31st level. The center of the floor has a large pit which is easy to fall into because the floor is very slippery, although levitate will negate the effect. Three shadowbones await you in the pit, which is also difficult to get out of because of the slipperiness of the floor.
The second level (the "Library") appears to be a school filled with students and librarians. All of the creatures here appear like ghostly erudites, humans, and dwarves. Killing students will get the Angry Librarian to spawn, who holds the key to the third level. There is also a secret bookcase in the northwest corner which leads to a mirror that will take you outside. Monsters here in 30th-34th level. Virtually all of the creatures on this level are casters. There is a trapped bookcase next to the entry, which can be disarmed.
The third level (the Servant's Quarters) is filled with various types of undead, mostly armored shadows and others. Killing the Enraged Shadowbeast will get you the key to the next level. There is a mirror here that is in the room with a bed that will take you to the outside. Monsters here are roughly 30th-43rd level. This level is confusing because of many long corridors and false walls.
The fourth level (the Crypt) has mummies, oozes, and shadows. The room is mazelike, and one can easily get lost down dead ends in it. A key to the fourth floor is required to reach the mirror to exit the tower, which is located behind a white door right near the entrance. There are several rares that spawn in an area near the exit (near the coffin) that give some very good loot. Killing Amonpheta is required to get Cara to appear for the key.
The fifth level (the Wedding) has many undead wedding participants that appear anywhere in the zone. The significant NPCs also appear anywhere in the zone. The bride (Daman) and the groom (Nosja) spawn most of the notable loot on this level, and appear in one fixed place with the priest. The mirror to take you back outside is located right where you appear in the zone. The key to the sixth floor drops from an enraged relative.
Note on the following two level areas, some people refer to the top two areas as levels 6, 7, and 8. Others refer to them as level 6 (which has two areas) and a level 7. Be aware of this because when someone says level 6 or 8, you can be pretty sure of what they're talking about, but if they say level 7 clarify if they mean the final level or not. I will refer to them as 6A and 6B and level 7.
The sixth level is divided into two separate areas (A and B). There are two areas, separated by a mirror that doesn't require a key to get through. Upon entering level 6, you are in area 6A and you can go to the right or to the left. To the left takes you to an area where there are Icy Shades, which you must kill in order to get the Ice Shade to spawn, which is a shade that summons a pet and appears as an old-world spectre (unlike the rest of this tower). Killing that monster will get Vhal'Sera to spawn in area 6B. This first area is also where the special Spirits spawn, and is also the location of some nasty traps, particularly the trap on the dragon statue near the exit mirror. Going to the right after the entrance takes you up several stairs to a ledge overlooking the shade area. Walking too close to the edge will make all these shades aggro, so be careful. Passing through the mirror there requires no key and takes you to 6B which is where Vhal'Sera drops the key for the seventh level. In this area are shrouded bats which spawn enraged vampires immediately upon their deaths. Vhal'Sera itself is highly magic resistant.
The seventh level is the home of the most powerful monster in the Tower, Tserrina. This area is much smaller than many of the other levels, and consists of essentially a long corridor, with a large spiral staircase inside that leads to another small area. In the area where you enter the spiral staircase room is a tapestry, which is a fake wall. Behind this wall is the area where Tserrina appears, randomly appearing after one of the bats in the area appear. If you are 51st level, it is possible to tell which bat will spawn Tserrina because it will be light blue while all other bats are always dark blue. Tserrina is a very difficult creature to defeat, because she is highly resistant to all spells with the exception of some lure spells and possibly fire-based spells. She will both summon and charm your companions. She drops a key that can be used to bypass all the keys on all the floors, so that you can pass through the alternate mirror on level one and go directly to level seven.
There is also possibly an 8th level to the tower which requires a quest to obtain the key to enter. Nobody has the found this quest or key, and the floor, quest, and key are not in the game at present time.
Travelling To and From Tower of Frozen Shadow
The Tower of Frozen Shadow is located at the loc 1700, 2850 in the Iceclad Ocean zone.